Nothing in cart

How To Size a Metal Bracelet Vol. 2: Pins and Collars
Jun 24, 2024
As mentioned in the first volume, I am duty-bounded to share with our customers and community how we size metal bracelets on our own. Previously, I divulged two methods to size up those bracelets held by screw-in links, known as the pins and collars system. I also promised to impart on how you deal with the other ubiquitous type in this second series.

While the screw-in link type is among the common and more accessible kinds to size by oneself, the pins and collars are considered quite the opposite. Any of us who first attempted resizing your Seiko watches would resentfully agree on this. Removing and reinserting the pins, especially with their collars, tends to be a tad more tedious and delicate process – definitely not a walk-in-park scenario like the screw-in type.
That said, it does not involve appalling complexity during the sizing procedure, nor is it an anathema. Things can smoothly be accomplished with a bit of practice (ok, maybe more than a bit) and the right tool to work with. As I have covered the differences and how to spot them in How To Size a Metal Bracelet Vol. 1: Screw-In Links, I’ll spend a little more time explaining what a pin and collar system is precisely before we gravitate to hands-on with them.

Of course, if anyone of you would like to dive in straight onto the action part, feel free to scroll down to the Tools and Steps sections below. There are three different methods over two distinct pin designs, with each carefully laid out, step by step.
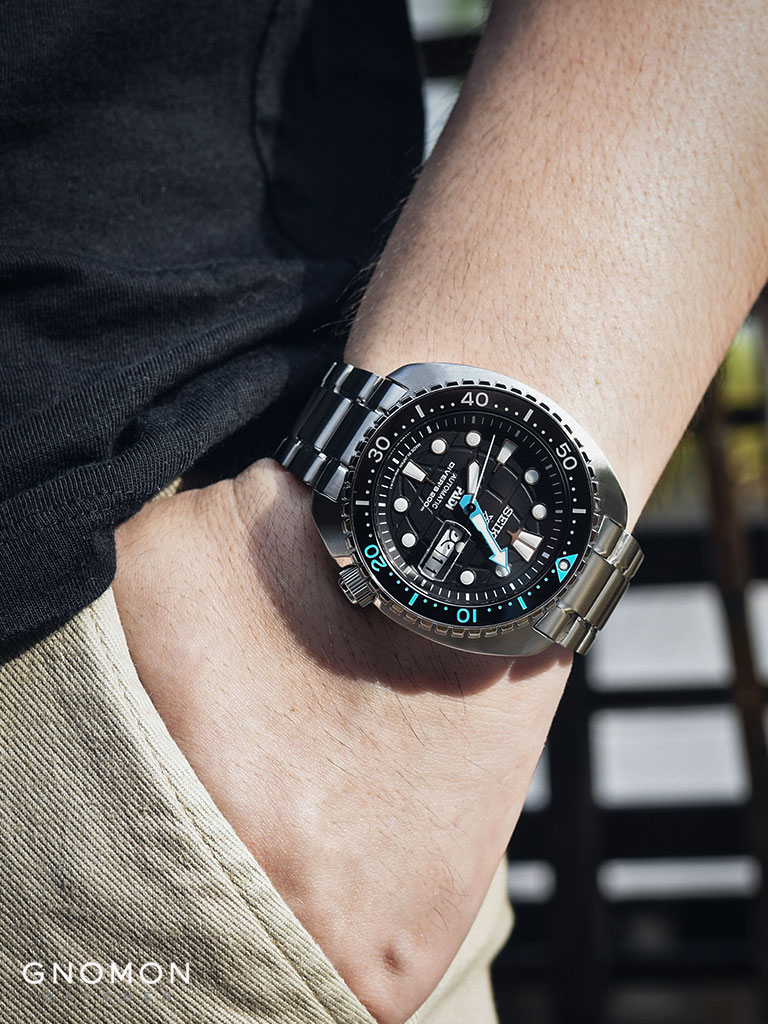
Although the pin and collar systems are found within Oris, Mido, and then some, no others applied it as much as our beloved watchmaker from the East, and that’s Seiko. The brand exploits this system from their most premium Grand Seiko, all the way down to the entry Seiko 5 Sports series.
Therefore, for this tutorial article, I would demonstrate how to size split pins and pin and collar systems (the two typical designs) through working on one Seiko 5 Sports model, a Seiko Prospex sports watch, and a Swiss Made Le Jour timepiece. So if you’re planning or already owning any Seikos or the 5s, you are in for a treat. But what about the rest that utilize the delicate pin systems? Fear not as these same methods demonstrated here (and on the Le Jour) could also be applied to other watch brands who employ this same system.

This tutorial sets out to be decidedly valuable for anyone performing the sizing on their own. Do remember to bookmark this tutorial in the future if you’d need to recap or ferret for instructions on how to size your pin-type watches. And also, remember to go through the correct system below before tackling your watch
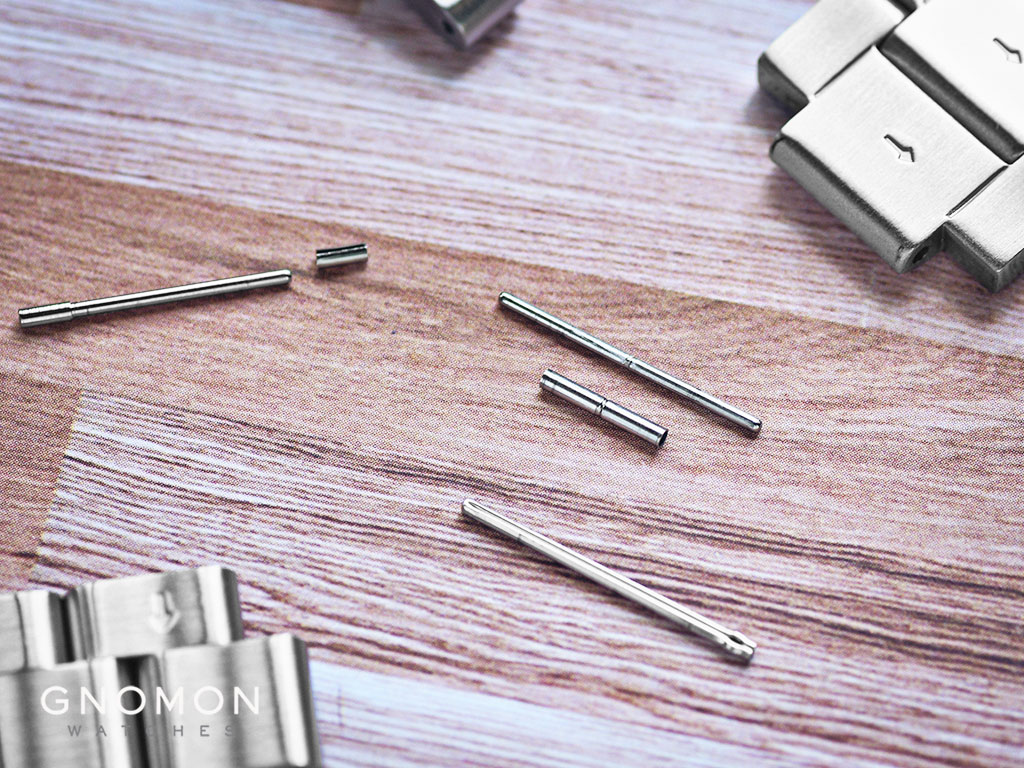
Types of Pins
There are two general forms of systems regarding the usage of a pin. The first would be the split pin type, reminiscent of the ubiquitous black hairpins. Also known as the “U pin,” the pin’s tips usually imbued a small dent that holds the pin in place in the metal link, noted through the split joints at one side of the hole, indicated by the arrow’s direction. The arrow engraved can be found on the back of those sizeable links pointing to how the pin would be “pushed” out later. All of such have the arrow indicator stamped into the links.

As the single split pin does not come with a collar that holds it firmly in place, this is to be found on metal bracelets from the Seiko 5 collection and others who prefer a simple and more straightforward resizing design than those with a paltry little thing called a collar.

Speaking of the following form would be the eminent pin and collar system. It’s a simple system that involves a straight pin with a small metal tube/s called ferrules but is widely known as the collar here. Although they do come in different forms – whereby the collars vary in sizes and insert in a separate section of the link – they hold their respective pins extra tightly together. This makes for all the more sturdiness when the links wrap around your wrist. Therefore, it usually applies to Sports watches.
The collar is sometimes placed either in the middle section (like the SARB or Swiss models) or the far end side of the link (like that Prospex Sumo or Turtle). Despite that, each can be removed when resizing, through the same methods illustrated below, as such things go.

Like split pins, the pins and collars’ direction to be removed is indicated by the arrow on the metal links’ backs. Once the pins are pushed out and detached from their links, each of their collar will come loose spontaneously. Consequently, you would have to take note of this extra collar and try not to lose any of it with all your might. I can not emphasize the utmost importance of not losing one enough. It is as tiny and inconspicuous as those bread crumbs – and once it’s fallen off a table or platform you’re working on, you might never see it again – as a result, you won’t be able to reinsert the pins as there’s nothing to hold firmly within.


A staggering abundance of watch companies has adopted the corroborative reliance of pins-and-collars design through many decades. One of the reasons is that they are allowed to manufacture slimmer bracelet designs compared to screw-in types. While others felt they’re sturdier as they do not need any lock-tight to prevent those screws from loosening naturally during wearing. It’s especially so for Seiko, as the brand applied this into most of its range. From the Prospex and Presage collections up to the Grand Seiko. It got to be good, isn’t it?
Tools Needed
So, I would like to tackle this particular section in two ways. Firstly, to “properly” size both the split pin (Type 1) and pins with collars bracelets (Type 2). Compared to screw-in link design, for these two, I’d recommend that you attain and clad in full gear to do so, as handling these intricate pins needs sedulous care.
So here goes. You need:
- A bracelet sizing tool, specifically for pushing the pins / pin-pusher tool

- Proper lighting that allows clear vision when meticulously handling the screw

- A non-magnetic nose plier or tweezer

- A small container or tray to hold the links and screws

- A soft cleaning cloth

- A spring-bar tool

- A small hobby hammer, as you’ll be obliged to use it if the pin is “stubborn” inside, or item #2. The bracelet sizing tool does not work effectively for this.

- A set of link pin pushers

- An eye loupe if you need to “zoom” in

- A wooden/ plastic watch-working box
Now, the above is a list of items you might want if you consider the “full kit.” It allows you to size all three pin designs: the split pin, the pin with the collar at the side, and lastly, the pin with its collar in the middle.
However, if you’re like me, who prefers an alternative approach or where certain circumstances wouldn’t allow you to have them all (do note that this only applies well to the pin-only bracelet). Like for instance, item 1, the sizing tool, or need other miscellaneous items like an eye loupe or tray, with the following quintessential items based on the above list, would therefore be sufficient to get things going:
2. Proper lighting is still a must
3. A small plier is still applicable here
6. Something for your watch to rest upon
7. Something to knock out the pins with item 8
8. You still need something to hold the bracelet in place

I’d confess that using fewer tools (even though more than screw-in type), it’s slightly riskier when handling those straight pins and collars than when clad with the complete list. The main reason being, they tended to tamper easily and bent during the process. That said, even if one has the complete set of tools, you’d need to operate these with extra caution and care, which will be evident with the below demonstrative steps.
Once again, this list of tools will allow you to not only size your Seikos but almost any other brand that possesses the pin-and-collar design. You might need to switch around the sizes of item 8, as the pins’ and holes’ sizes may vary.

All of the above items might seem bothersome to attain, but nowadays, you can purchase them in a set. For example, search “Watch Repair Tool Kit” or “Watch Resizing Kit” on your search engine, and you will be surprised to see everything available for purchase. A decent set would cost roughly between 30 to USD 50, with all that you need to size both your push-pins and screws types.
A Perfect Fitting Guide
This particular section was illustrated before in the Volume 1 Screw-In Link tutorial, but I’d find it exceptionally insightful. Therefore, I have copied my take on this right here below.
Is there a golden rule for a perfect way to size down to a perfect fit? In reality, I don’t think there is one as I strongly feel it’s to each their own. For example, some prefer the watch swaying a tad looser than most of us; others prefer feeling the “wrap” that, when removing the bracelet, leaves marks of your links and case-back motifs along. But I would like to propound mine as an example through my experience in sizing my bracelets and those I saw through the Gnomon team faithfully sticking to our customers in-store.
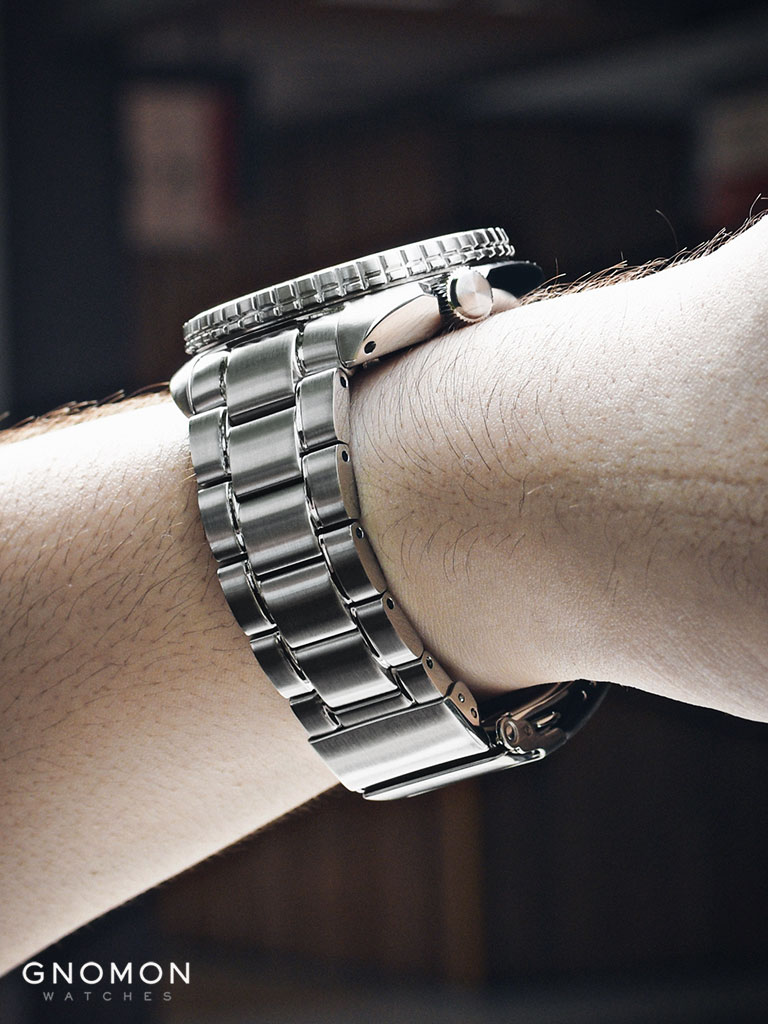
For a start, I’d like to recommend a good fit by keeping it a tad loose after sizing. How flexible, you might wonder? Not much, just the distal phalanx (front portion) of your index finger slipping through between the bottom clasp and your wrist.
A perfect circumstance would seem to be removing even links on both the top 12 o’clock and bottom 6 o’clock sides. But in reality, this is not usually the case. Most of the time, we realize when done with the final adjustments by removing a half-link or the micro-adjustment through a clasp, sometimes even both. We’d learn that we need to remove one side more than the other. Intriguingly, we don’t have to get overwrought as I assure you the result of the watch and clasp would still seemingly balanced on the wrist. Now the question is, which side should you remove more from?
I would recommend removing the extra full or half-link from the bottom side at 6 o’clock based on my personal preference. The reason simply is when the bottom side seems to be “shorter,” the watch would not lob down and away from you as if it’s a slip-dash job on the sizing and purportedly feels like it’s going to overturn any moment. With a “shorter” side at 6 o’clock, your watch would always be at an angle where you could properly view the time, and the case feels more dead-center on top of your wrist.
With all that said, you might prefer a “tighter” or “even looser” fit; heck, even having the extra link removed from the top 12 o’clock, it’s all up to one’s preference, and it’s acceptable to do so, like what I determined at the start of this section. However, I would cohere my own “golden rule” and “perfect fitting” to illustrate the steps in sizing a screw-in link bracelet for the sake of this article.
Removing the Links
Unsurprisingly, different bracelet designs result in the number of links to be removed varying. So I’d usually slip it across my wearing wrist and compress both sides together just to gauge the number of “excess” links. Once I got that rough gauge, I’d start the removal process.

As there are two different pin systems, one with another two different designs, I’d first go through the sole push pins in two ways – one with the full gear and one in a much casual way with minimal tools. So let’s begin.
Type 1: Push-Pins Without collars (split pin)
If you decide to size your bracelet with the complete list, here it is:
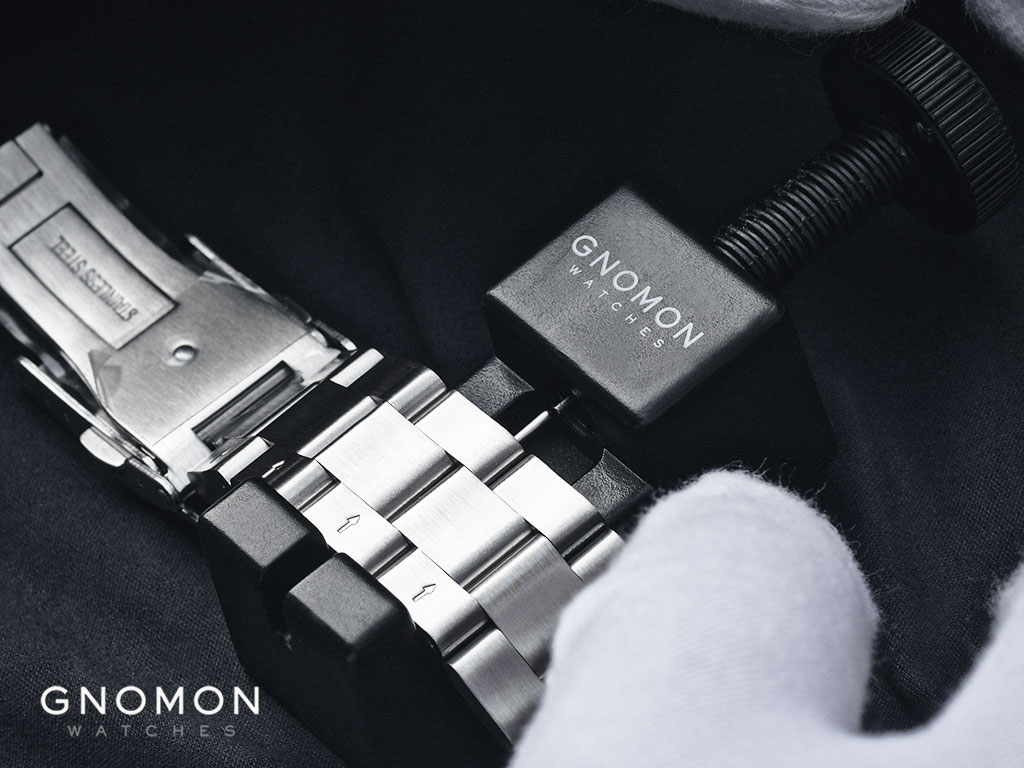
Step 1: Spread the soft cloth on a table or platform high enough for you to rest your elbows or arms on. It’s ideal to have your elbows placed on the surface top – like how a watchmaker does – allowing you to stabilize both your hands when handling the tool and watch.

Step 2: Now, place the pin-pusher tool in the middle of the soft cloth so your watch would be safe within a lighted area. You do not want your watch or parts to lie all over them and get misplaced. I would place the screw handle portion towards your primary hand direction.

Step 3: Remove the spring bar from the bracelet clasp with your spring-bar tool’s pointer tip. This would allow your watch to open and lay flat, enabling you to work on each side of the bracelet. For example, you could start from the bottom 6 o’clock links. Place the clasp’s spring bar into the tray as you do not want to lose it.

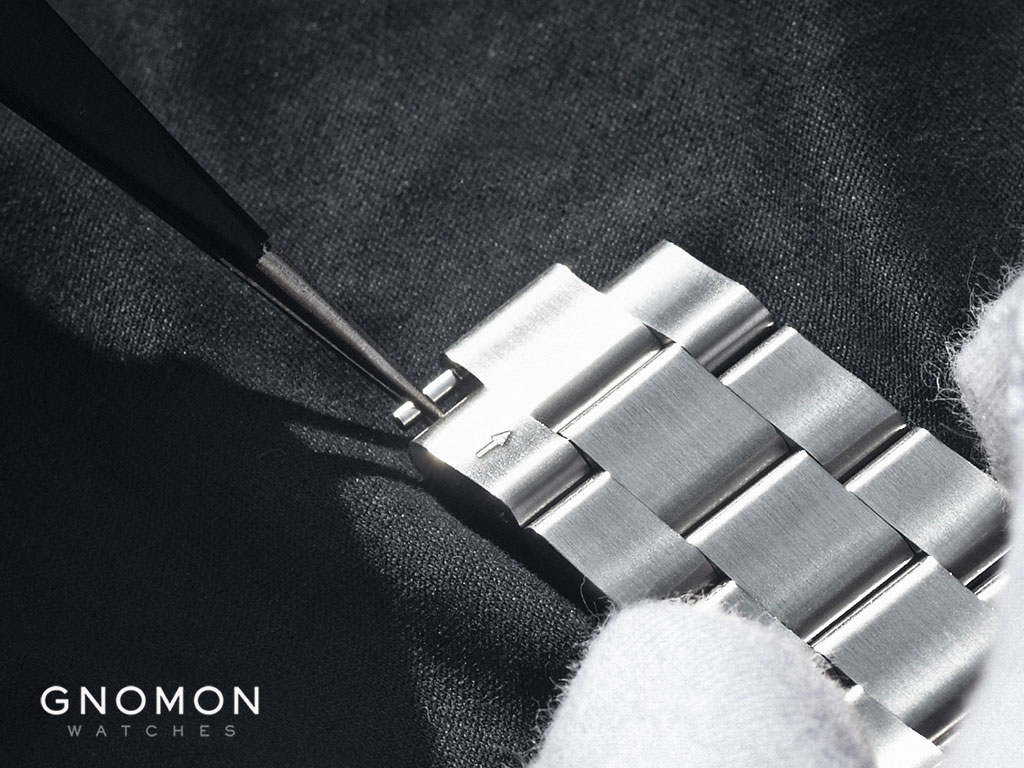
Step 4: Put on your loupe and align the selected watch link across the pin-pusher tool. The bracelet should link with the arrow facing away from the tool’s handle (where the spindle is). Ensure the pinhole is in line with the handle’s spindle and the small groove/s of the device on opposite sides for the pin to leave.

Step 5: When things are in place, gently rotate the screw handle inwards with your primary hand just to check whether it enters the pinhole. All that while the other hand is supporting the tool’s base. Do not be too quick, as you do not want to leave a mark surrounding the hole if it’s still not aligned properly.

Step 6:Once the tip is within the link’s pinhole, continue to unscrew the handle until it pushes the split pin out of the bracelet link. Once done, remove it from the small grooves section, and carry on Steps 4 and 5 with the other link to finish up one side of the bracelet. If you’re not sure about the number of links to remove, I’d recommend two links for a start on the bottom 6 o’clock side.

Step 7: When the links and pins are removed, place them into the tray for safekeeping. Reattached the links by slotting the pin in a reverse direction from the arrow (the split sides facing away from the arrow still) and push it back in by flipping over the bracelet onto the push-pin tool. Screw the handle again, then align the arrow facing your handle until the pin sits flush on both sides of the link’s hole.

Step 8: Once done, repeat Step 4 to 7 on the top side at 12 o’clock of the bracelet. Then reattach the clasp’s spring bar, and you can check the fitting on the wrist.

As recommended, do not remove links until the watch wears on the wrist with no space (like leaving marks on the wrist) at all to breathe. What I would advise sincerely is to remove them until it’s a tad loose. If your clasp comes with micro-adjustment holes, proceed to Step 9 for micro-adjustment.

Try it on your wrist and see if any more is needed to remove. Remember, remove the extra from the bottom side if you need to remove odd numbers of links. Also, don’t forget to utilize the half-links if provided.

Step 9: If the clasp comes with micro-adjustment through a number of tiny holes on both sides, you can make your fine adjustment through the use of the spring-bar tool’s pointer tip. Poke one side of the clasp’s hole, slide the inner spring-bar towards the inside, and repeat on the other side to make it even.


This would be the best scenario for finding the “perfect” spot to wear the watch comfortably. On others that do not supply with the clasp adjustment, you should fully utilize those half links provided as they will be your best chance to find your sweet spot.
The Alternate Way ( Push-pins without collar // split pin)
If you prefer not to utilize tools like the push-pin tool and loupe or do not have one at the moment, the following steps will demonstrate how to get your watch-sized alternative with items number 3, 6, 8, 10 (see above Tools Needed section). Nevertheless, you need to be extra careful when applying these steps.

Step 1: As usual, spread the soft cloth on a table or platform high enough for you to lay your elbows on. It’s ideal to have your elbows or arms placed on the surface top – like how a watchmaker does – allowing you to stabilize both your hands when handling the tool and watch.
Step 2: Now, place the plastic/wooden watch-working box in the middle of the cloth and make sure the area is well lit. I can’t emphasize great lighting enough as you will be working with tiny delicate components.

Step 3: Insert the watch bracelet across fitting grooves of the watch-working box. The bracelet should have the links with the arrow direction pointing down towards the ground, and you could start from the bottom 6 o’clock links. Ensure the bottom gaps from the watch-working box are present as you need to push the pins through.

Step 4a: Using your secondary hand, align the fitting pin pusher (item 8) in the link hole, gently use the hobby hammer, and tap the top handle of the pin pusher. This way allows you to knock out the pins within the link. It should fall out through the watch-working box, onto the cloth.


Step 4b: If the pin does not come off after knocking (like it’s stuck halfway from the link), remove the bracelet, use the plier/tweezer and clip it parallel from its exposed area. Once done, exert minimal force away from the link (which the arrow is pointing towards your pulling direction) and steadily remove the pin. After removing, reinsert the bracelet back into the watch-working box to attempt the second pin.

Step 5: If possible, do not shift the bracelet while you’re removing the second pin from the selected link (if Step 4a is successful). If not, adjust the band by sliding it along the box’s grooves, allowing you to remove the second pin. Once done, remember to place pins and the removed links onto the side carefully.

Step 6: Flip the bracelet over (where the arrow points upwards towards the sky) onto the soft cloth and reinsert the pin in a reverse manner to reattached the watch. The split pinheads should be jutting out a little at this point from its link hole.

Step 7: Place the attaching bracelet back into the watch-working box (arrow facing up) so that you can stabilize the links, allowing you to use the pin-pusher and hobby hammer to gently re-knock the pin back properly into the link. Do check that the pin sits flushed within the link on both hole sides.


Step 8: Now, once done, you can repeat steps 3 to 7 on the other side of the bracelet. Double-check on the arrow where it faces downwards before hammering the pins.

Much like the first method, do not remove links until it wears on the wrist with no space (like leaving marks on the wrist) at all to breathe. What I would advise sincerely is to remove them until it’s a tad loose. If your clasp comes with micro-adjustment holes, proceed to Step 9 for micro-adjustment.
Try it on your wrist and see if you need to remove any more links. Remember, remove the extra from the bottom side if you need to remove odd numbers of links. Also, don’t forget to utilize the half-links if provided.


Step 9: If the clasp comes with micro-adjustment through the number of tiny holes on both sides, you can simply make your fine adjustment through the use of the spring-bar tool’s pointer tip. Poke one side of the clasp’s hole, slide the inner spring-bar towards the inside, and repeat on the other side to make it even.

This would be the best scenario for finding the “perfect” spot to wear the watch comfortably. On others that do not supply with the clasp adjustment, you should fully utilize those half links provided as they will be your best chance to find your sweet spot.
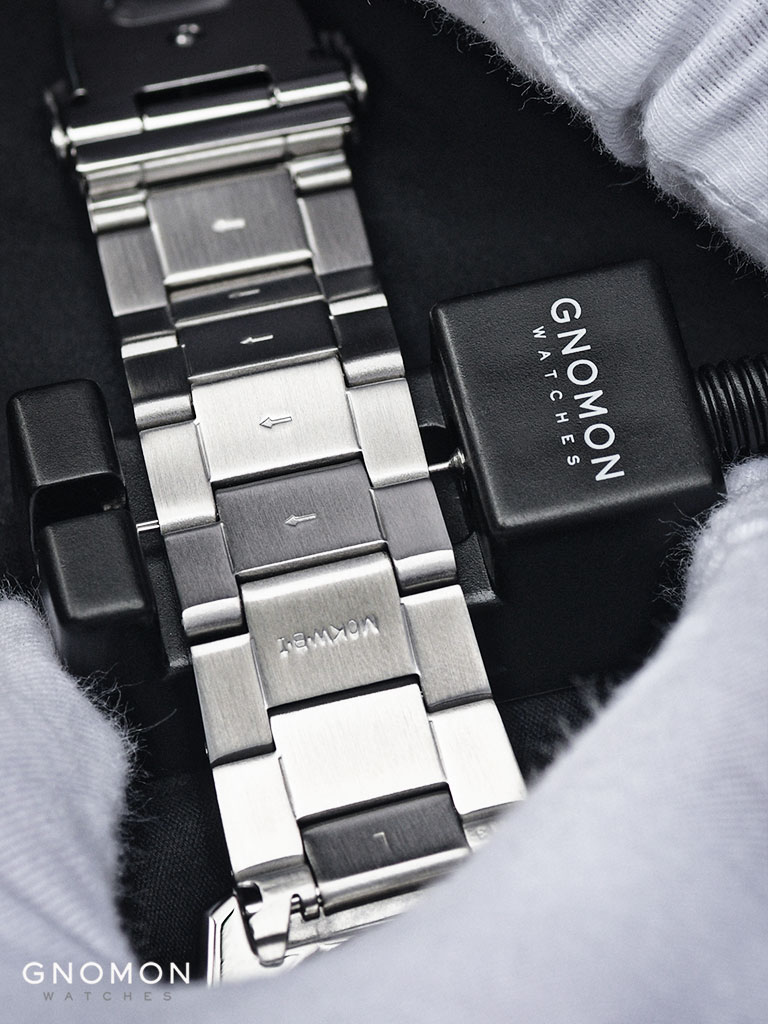
Type 2: Push-Pins with Collars (Seiko watches and such)
Most of the push-pins chaperone with their collars in today’s time, boasting better security when the links articulate through our wrist actions. For most Seiko metal bracelets, this seems to be their go-to standard.
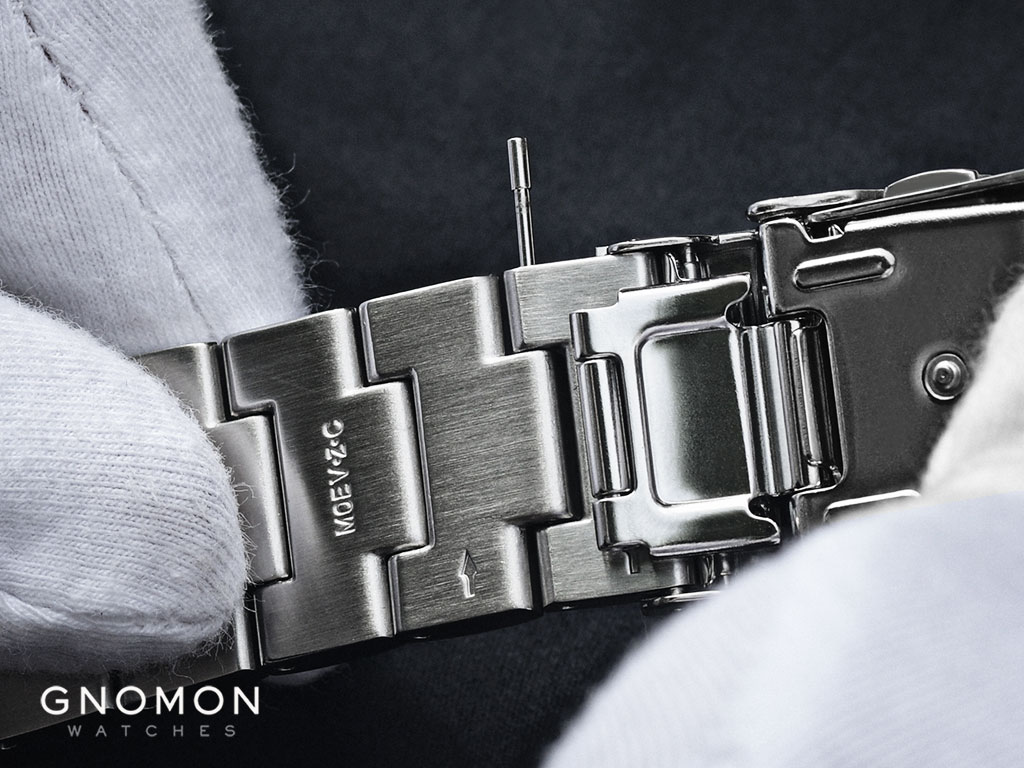
The collar position, usually found on the opposite side of the arrow indicated on the link’s rear. And on the other side, the pin usually has a larger shoulder instead of the split heads, which would be helpful later on when you reattach the bracelet links.

Another pin with collar design, also synonymous with Seiko and most of those from Switzerland and Europe, is where a slightly longer collar holds the pin from the middle. However, this design is applied mainly to other non-Japanese watchmakers, like Hamilton, Le Jour, etc. Therefore I will differentiate the steps on how to re-fit them through the process later on.
Without further ado, let’s begin resizing these bracelets:
Step 1: Spread the soft cloth on a table or platform high enough for you to lay your elbows or arms on. It’s ideal to have your elbows placed on the surface top – like how a watchmaker does – allowing you to stabilize both hands when handling the tool and watch.

Step 2: Now, place the pin-pusher tool in the middle of the soft cloth so your watch would be safe within a lighted premise. You do not want your watch or parts to fall anywhere else. I would place the screw handle portion towards your primary hand direction.
Step 3: Remove the spring bar from the bracelet clasp with your spring-bar tool’s pointer tip. This would allow your watch to open and lay flat, enabling you to work on each side of the bracelet. For example, you could start from the bottom 6 o’clock links. Do place the clasp’s spring bar into the tray as you do not want to lose it.

Step 4: Put on your loupe (if not is alright) and align the selected watch link across the pin-pusher tool. The bracelet should link with the arrow facing away from the tool’s handle (where the spindle is). Ensure the pinhole is in line with the handle’s spindle and centered with the small groove/s of the tool on the opposite side for the pin to leave.

Step 5: When things are in place, gently rotate the screw handle inwards with your primary hand just to check whether it enters the pinhole. All that while the other hand is supporting the tool’s base. Do not be too quick, as you do not want to leave a mark surrounding the hole if it’s still not aligned properly. Do note that for some watches, we will be pushing the end where the collar is.
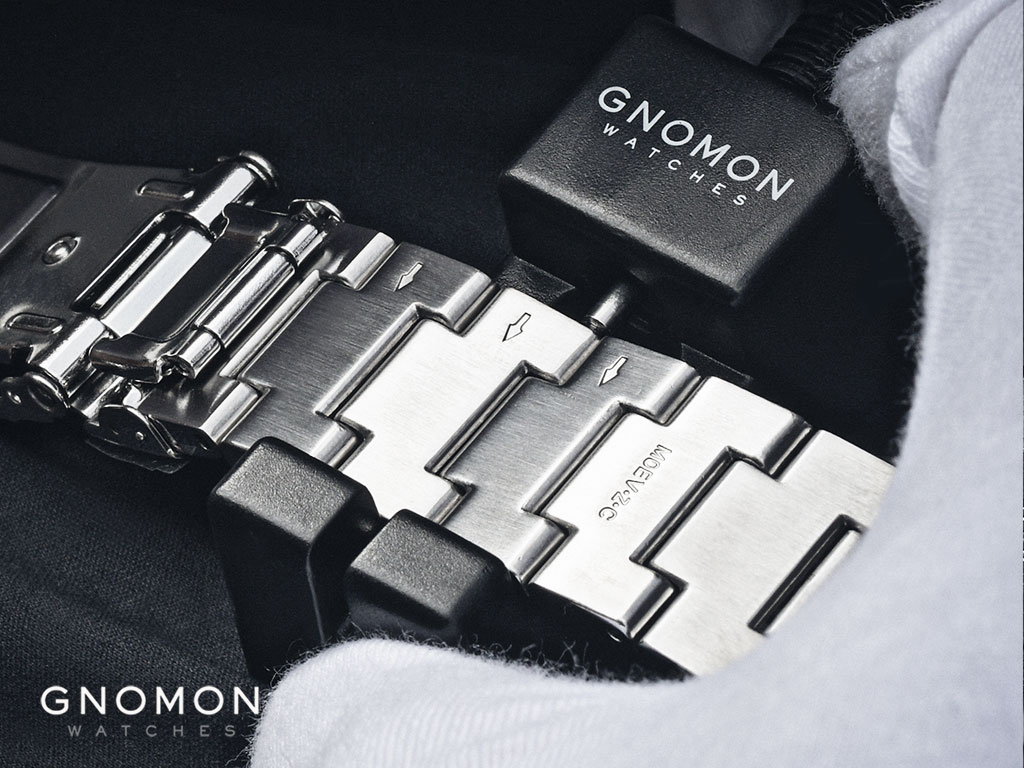
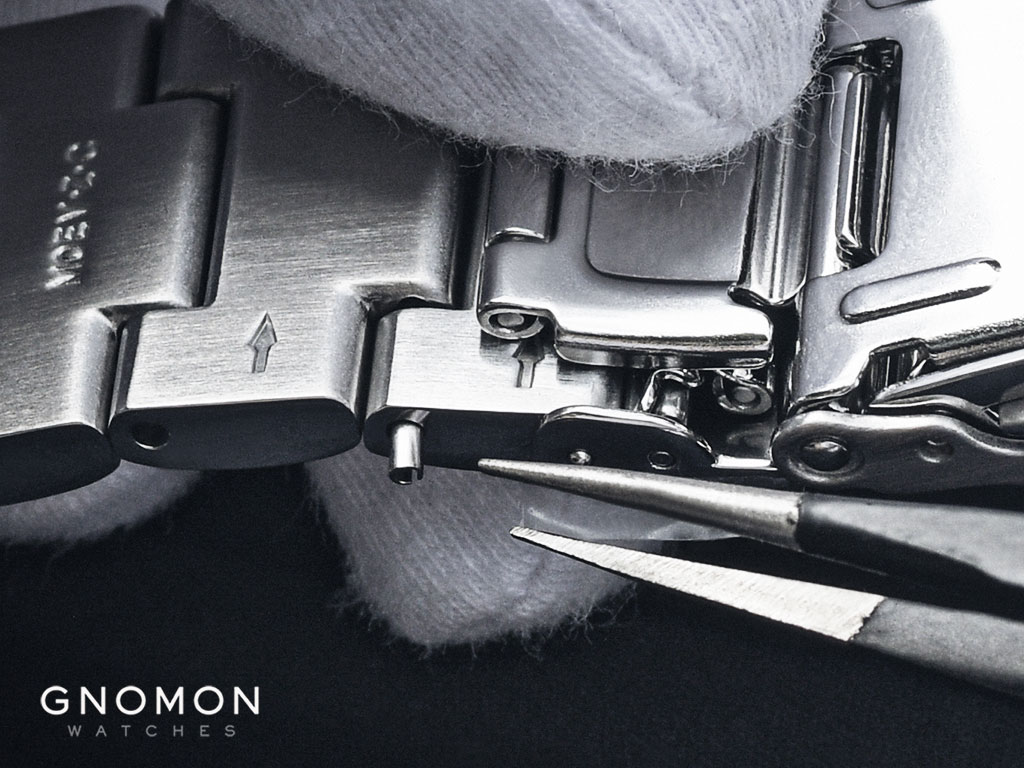
Step 6:Once the pusher’s tip is within the link’s pinhole, continue to unscrew the handle until it pushes the pin out from its collar from the bracelet link. Once done, remove it from the small grooves section.

Before proceeding further, check that the collar is within your sight. Sometimes, or most of the time, the collar will be stuck at the tip of the pin-pusher tool (if the collar is on the side).


Step 7: Detach the collar from the pusher’s tip (if needed) efficiently with the help of the tweezer. REMEMBER, you do not want to lose this tiny little collar, as you need it to reattached the link. Always place the collar and pin into the tray together.

Step 8: You can proceed by carrying on Steps 4 and 5 with the other link to finish up on one side of the bracelet. If you’re unsure about the number of links to remove, I’d recommend two links for a start, on the bottom 6 o’clock side.

Step 9: Here’s the tricky part. To reattach the links, if 1: your collar sits on the side of the link.
It has aligned both detached links together first. Then, do this step on the soft cloth with the arrow facing downwards to the ground and reinsert the collar with your tweezer from the top. It should be held within the link hole.
Lay the watch flat on the pin-pusher tool (item 1) gently where the link’s arrow points towards the screw handle. Reinsert the pin with your tweezer at the other side and opposite direction from the arrow; push it back in. You will realize the collar would protrude a little from the link hole.
Now steadily insert a pin pusher (item 8) that fits nicely into the link hole where the collar is (the opposite side of the screw handle) but is larger a tad than the collar. All that while, the links should be laid flat on the tool with your other hand supporting them. You then align the tool’s pin tip with the protruding pin.

Once done, screw it towards the link hole slowly and steadily, all that while your supporting hand with the pin pusher should be held sturdily. This way, it allows the pin to “sit” into the collar. Make sure the pin sits all within both sides of the link holes.


Or 2: your collar sits in the middle section of the link.
This method is slightly more manageable than those mentioned above. Place the watch flat on the cloth and reinsert the collar into the middle section of the detached link by using your tweezer. Once properly inserted, it would not fall through (on normal circumstances when you don’t tilt it) on the other side.
Reattach the other side of the link, and hold it together with your supporting hand. All that while you reinsert the pin in a reverse direction (opposite from the arrow direction), and make sure it feels tight or stuck within a little.

Placed the bracelet onto the pin-pusher tool, where the protruding pin (arrow direction facing screw handle) aligns with the tool’s tip. With everything in place, screw the handle while the other supports the reattaching links on top of the tool. Slowly, screw the pin back into the link until the pin sits flush within.
REMEMBER to make sure you do not exert too much force or too quickly. This is to prevent the tool’s tip from slipping away from the link’s pin, scratching, and damaging the sides of the bracelet.

Step 10: Now, once done, you can repeat steps 4 to 9 on the other side of the bracelet. Double-check the link’s arrow where it faces downwards before screwing to push the pins on the push-pin tool.

After getting the top side of the bracelet done, reattach the spring bar at the clasp to connect the whole bracelet. As reminded, do not remove links until the watch wears on the wrist with no space (like leaving marks on the wrist) at all to breathe. What I would advise sincerely is to remove them until it’s a tad loose. If your clasp comes with micro-adjustment holes, proceed to Step 11 for micro-adjustment.

Try it on your wrist and see if any more is needed to remove. REMEMBER, remove the extra from the bottom side if you need to remove odd numbers of links. Don’t forget to utilize the half-links if provided. Apply the previous steps to remove those extra links.

Step 11: If the clasp comes with micro-adjustment through the number of tiny holes on both sides, you can simply make your fine adjustment through the use of the spring-bar tool’s pointer tip. Poke one side of the clasp’s hole, slide the inner spring-bar towards the inside, and repeat on the other side to make it even.

This would be the best scenario for finding the “perfect” spot to wear the watch comfortably. On others that do not supply with the clasp adjustment, you should fully utilize those half links provided as they will be your best chance to find your sweet spot.
There’s No Alternate Way by Yourself
Alright, at this point, you might be wondering if there are alternative ways (even just one) without having to utilize the push-pin tool. There’s not one concrete method, at least when you’re doing it all on your own. Sure, someone can aver on using that plier, hammer, and link pin pushers, but I’d strongly do not encourage doing it alone.

The offbeat route is arguably doable as long there are extra pairs of hands to secure and support the tools and watch itself. It will be hazardous if one tries to accomplish it all alone. Imagine the need to keep the watch and bracelet stable while hammering the pin out, with the link pin pusher in-between. That just smells Iike nothing but disaster, like an accident is bound to occur sooner or later.
It would defeat the purpose of this article if we included other assistance during sizing. Therefore I would strongly advise you to stick to the aforementioned steps in this guide and always use the pin pusher tool to size ANY of your pin-and-collar bracelets. After all, the pusher tool is purposefully made explicitly for this while being affordable to get one, and is handy in the long run.
Personal Thoughts and a Few Reminders
If, in Volume 1, where the screw-type bracelet is considered one of the easiest to handle, you would agree much more with me in regards to pin style designs sitting on the other side of the difficulty spectrum. One has to realize that arduous efforts are needed to extract those pins. And they arguably require several more specific tools for either method.

From utilizing the bracelet push-pin tool to the beholden tweezer/plier and watch-working box that allows you to resize those links, it frankly shows that sizing pins and collars are not straightforward. Crucially, each consists of more delicate components whereby you’d need to pay extra attention to.
On top of all, it’s especially back-breaking when you’re using a tweezer/plier to remove those stubborn pins, as well as when getting the pins back in to reattach the bracelet. Any mistake could cause you to scar your watch, and the pin cannot be reused once it’s impaired. Sometimes even a little carelessness by losing the collar could be devastating.

With much practice and going through each step here, it’ll seem easier done, and you’ll be less worried the next time around. These push pins are equivalent verily in parallel to the size of those trouble-free screw-type links. To cotton the idealogy of sizing those pins with their collars, you’d need to brush up on acuity and give some extra attention through several hands-on practices. In turn, this would build up confidence and your hand-eye coordination, allowing you to be familiar with every step, executing with precision. Practice makes perfect.
There’s no shortcut to these types of metal bracelets. Especially so when it’s your first time or when it’s been a while. It behooves you to go through the steps routinely while carefully utilizing all those essential tools listed above.

With the proper tools, the battle is already half won. When dealing with those fragile pins, restrain yourself from applying too much force when handling them out and back into the links. And make sure the plier and tweezer would be clipping straight onto the pin in one straight line and pulling in one upward direction so that you won’t have the chance to bend the pin.
As I have mentioned in Volume 1, sizing your watch bracelet will enhance your satisfaction and enjoyment in this hobby. It’s still oh-so-true here. All the more so during this era where we purchase our watches online, and there’s nobody to help you at your cozy place. Therefore, learning and practicing resizing your own would considerably benefit you whenever you need to readjust your current watches and new ones.
While I know that some of you have the propensity not to get hands-on with these particular pins and their collars, I would strongly urge you to give it a try, as long as you’ve gone through the above steps and have the tools needed. It’s an enjoyable process, where you get to personate as a bit of watchmaker, with a sense of satisfaction by fitting your adored watch all by yourself and onto your wrist. The worst thing that can happen is that you inevitably bend a few pins or losing collars during the process. It is through a natural process, and learning like this would you build experience and finesse. Most importantly, treat this as part and parcel of this exciting hobby, and loving it more through different aspects.
Conclusion
So there we go, the somewhat exhaustive list of methods and sub-methods to resize your pins with collars bracelets. Although there are other effective ways to size them, I hope my succinct tutorial would benefit anyone desiring to remove those additional links independently. What is essential, however, is to give it a try on your own. It’s all the more enjoyable to get things done on your own.


